HDR Settings - Details Enhancer
Details Enhancer > Main
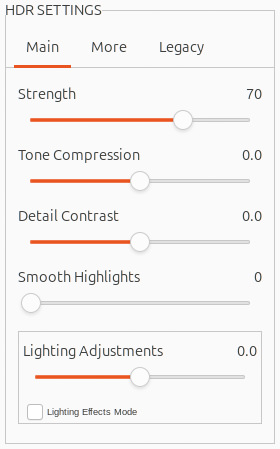
HDR Settings - Details Enhancer
- Strength
Affects the amount of enhancement given to contrast and detail in the image. A value of 100 gives the greatest enhancement. Moving the slider to the left gives a more natural effect. The default value is 70.
- Tone Compression
Adjusts the dynamic range of the rendered image. Moving the slider to the right decreases the dynamic range, brightening the shadows and darkening the highlights. Moving to the left has the opposite effect, giving a more "natural" look.
- Detail Contrast
Controls the amount of contrast applied to detail in the image. Moving the slider to the right increases the contrast of details and gives a sharper look to the image, but also has a darkening effect. Moving to the left decreases the contrast of details and brightens the image.
- Smooth Highlights
Reduces contrast enhancements in the highlights, preventing white highlights from turning grey, or preserving a uniform blue sky. It is also useful for reducing halos around objects placed against bright backgrounds.
- Lighting Adjustments panel
The two lighting adjustment modes affect the overall "look", controlling the extent to which the image looks natural or surreal.
- Lighting Adjustments slider
Affects the overall "look", controlling the extent to which the image looks natural or surreal. Moving the slider to the right makes the image look more natural. Moving to the left makes it look more "painterly" or surreal.
- Lighting Effects Mode check box
Lighting Effects Mode lets you switch between two modes for the Lighting Adjustments setting, where each mode produces slightly different results. Checking the box tends to produce results with a type of "Magic Light" effect. Note that finer control is not possible in this mode.
- Lighting Effects Mode
Affects the overall "look", controlling the extent to which the image looks natural or surreal.
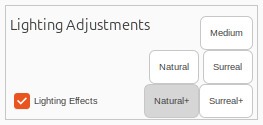
Details Enhancer > Lighting Effects Mode
Details Enhancer > More
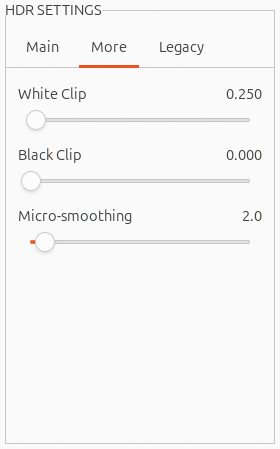
Details Enhancer > More
- White Clip
Sets the maximum value of the rendered image. Moving the slider to the right sets a lower maximum value, which brightens the image and increases global contrast. Moving to the left sets a higher maximum value, which decreases global contrast and reduces highlights clipping. The default value is 0.25%.
- Black Clip
Sets the minimum value of the rendered image. Moving the slider to the right increases global contrast. Moving to the left sets a lower minimum value, which decreases global contrast and reduces shadows clipping.
- Micro-smoothing
Smooths out the enhancement of small details, which has the effect of reducing noise in the sky for instance, and tends to give a "cleaner" look to the result.
Details Enhancer > Legacy
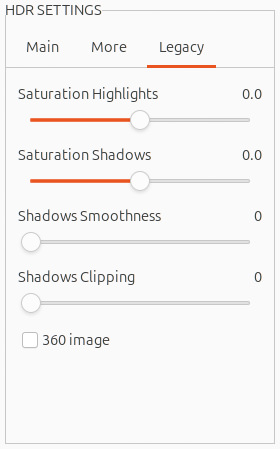
Details Enhancer > Legacy
- Saturation Highlights
Adjusts the color saturation of the highlights relative to the color saturation set with the Color Saturation slider. Values higher than 0 increase the color saturation in the highlights. Values lower than 0 decrease it. The default value is 0.
- Saturation Shadows
Adjusts the color saturation of the shadows relative to the color saturation set with the Color Saturation slider. Values higher than zero increase the color saturation in the shadows. Values lower than zero decrease it. The default value is 0
- Shadows Smoothness
Reduces contrast enhancements in the shadows.
- Shadows Clipping
The value of the Shadows Clipping sets how much of the shadows range is clipped. This control may be useful to cut out noise in the dark area of a photo taken in a low-light situation.
- 360° Image
Checking this option eliminates the seam between the left and right sides of a panorama viewed in a 360 degree panoramic viewer. This option is intended for a stitched panorama - it should not be used for individual frames of a panorama that have not yet been stitched.
Contrast Optimizer
Contrast Optimizer
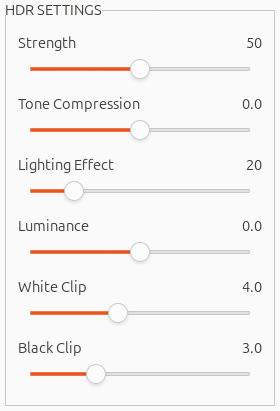
- Strength
Affects the amount of enhancement given to contrast and detail in the image. A value of 100 gives the greatest enhancement. Moving the slider to the left gives a more natural effect. The default value is 50.
- Tone Compression
Alters the dynamic range of the rendered image. Moving the slider to the right decreases the dynamic range, brightening the shadows and darkening the highlights. Moving to the left has the opposite effect, giving a more "natural" look to the image.
- Lighting Effect
Controls the prominence of the shadows, affecting the overall look of the image. Moving the slider to the right brightens the shadows, giving a more "vibrant" or surreal look. A value of zero disables the effect, leaving the shadows unaffected. The default value is 20.
- Luminance
Affects the brightness of the image, with the strongest changes in the lighter areas and highlights. Moving the slider to the right brightens the lighter areas, resulting in a bolder looking image, while moving to the left gives a darker, more subdued look.
- White Clip
Adjusts the amount of highlights clipping. Moving the slider to the right brightens the image and increases global contrast. Moving to the left decreases global contrast and reduces highlights clipping.
- Black Clip
Adjusts the amount of shadows clipping. Moving the slider to the right darkens the image and increases global contrast. Moving to the left decreases global contrast and reduces shadows clipping
Tone Balancer
Tone Balancer
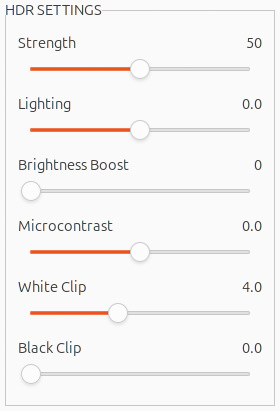
- Strength
Strength controls the amount of contrast and detail enhancement in the image. Moving the slider to the right increases the enhancement, which has the effect of brightening the image. Moving the slider to the left gives a more natural effect. A value of 100 gives the greatest enhancement. The default value is 50.
- Lighting
Lighting affects the shadows, or darker parts of the image. Moving the slider to the left darkens the shadows, which tends to increase the contrast within the image. Moving it to the right brightens the shadows, decreasing the contrast. The default value is 0.
- Brightness Boost
Amplifies the effect of the Strength setting. Moving the slider to the right brightens the image, while preserving the highlights, and tends to affect the darkest areas in the image more. The default, 0, is the minimum value.
- Microcontrast
Controls the prominence of the finer details in the image. Moving the slider to the left decreases the detail, giving a smoother looking result. Moving the slider to the right highlights the details, increasing the clarity of the image. The default value is 0.
- White Clip
Adjusts the amount of highlights clipping. Moving the slider to the right brightens the image and increases global contrast. Moving to the left decreases global contrast and reduces highlights clipping
- Black Clip
Adjusts the amount of shadows clipping. Moving the slider to the right darkens the image and increases global contrast. Moving to the left decreases global contrast and reduces shadows clipping
Tone Compressor
Tone Balancer
- Tonal Range Compression
Controls the compression of the tonal range. Moving the slider to the right has the effect of shifting both shadows and highlights toward the midtones.
- Contrast Adaptation
Adjusts the contrast in relation to the average brightness. Moving the slider to the right tends to decrease contrast and give more "pronounced" colors. Moving to the left tends to increase contrast and give a more "natural" look.
- White Clip
Adjusts the amount of highlights clipping. Moving the slider to the right brightens the image and increases global contrast. Moving to the left decreases global contrast and reduces highlights clipping.
- Black Clip
Adjusts the amount of shadows clipping. Moving the slider to the right darkens the image and increases global contrast. Moving to the left decreases global contrast and reduces shadows clipping.
Fusion/Natural
Fusion/Natural
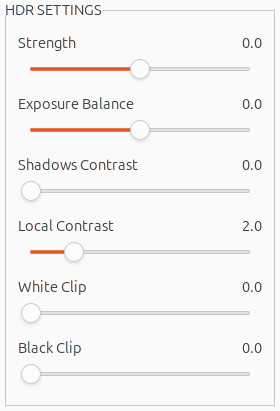
- Strength
Sets by how much local contrast is accentuated. Moving the slider to the right tends to brighten the shadows and to show more details in the highlights. Moving to the left produces a more "natural" effect.
- Exposure Balance
Controls the brightness of the fused image by adjusting the influence each of the input photos has on the final result. Moving the slider to the right gives the overexposed photos more influence, resulting in a brighter result. Moving to the left darkens the result by giving the underexposed photos more influence.
- Shadows Contrast
Affects the contrast of shadows in the image by darkening the darkest shadows and lightening the midtones. This results in a more realistic effect.
- Local Contrast
Increases the contrast and sharpness of details in the image. Increasing local contrast may have the side effect of making noise more visible and of creating thin halo effects around strong luminosity edges. Values near the maximum tend to give a surreal look to the image. The default value is 2.
- White Clip
Adjusts the amount of highlights clipping. Moving the slider to the right brightens the image and increases global contrast. Moving to the left decreases global contrast and reduces highlights clipping.
- Black Clip
Adjusts the amount of shadows clipping. Moving the slider to the right darkens the image and increases global contrast. Moving to the left decreases global contrast and reduces shadows clipping.
Fusion/Interior
Fusion/Interior
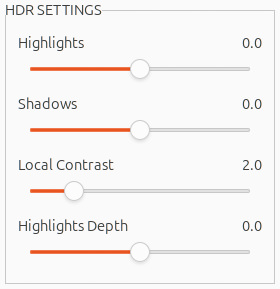
- Highlights
Adjusts bright areas in the image. Moving the slider to the right brightens the highlights. Moving to the left darkens highlights and recovers more highlight details.
- Shadows
Adjusts dark areas in the image. Moving the slider to the right brightens shadows and recovers more shadows details. Moving to the left darkens shadows.
- Local Contrast
Increases the contrast and sharpness of details in the image. Increasing local contrast may have the side effect of making noise more visible and of creating thin halo effects around strong luminosity edges. Values near the maximum tend to give a surreal look to the image. The default value is 2.
- Highlights Depth
Affects the colors of the highlights in the image. Moving the slider to the right adds depth to the highlights, darkening the highlights and increasing their colorfulness.
Color Settings
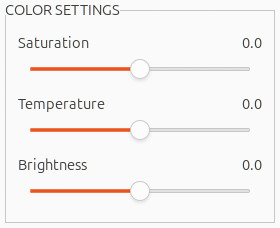
Color Settings
- Saturation
Adjusts the color saturation of the overall image. The greater the saturation, the more intense the color. Setting Saturation to its lowest value (-10) produces a gray scale image. The default value (0) leaves saturation unchanged.
- Temperature
Adjusts the color temperature of the image, giving it a “warmer”, more yellow-orange colored look when moving the slider to the right, or a “colder” more bluish look when moving the slider to the left. The default value (0) leaves the color temperature unchanged.
- Brightness
Adjusts the overall brightness of the image.