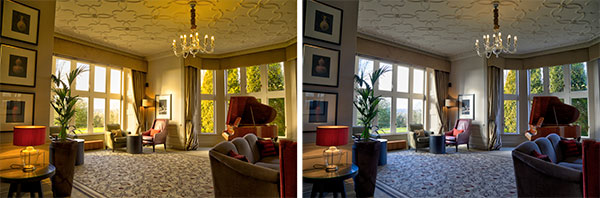
Have you ever sat down to edit your photos and noticed that the colors just don’t look quite right? Maybe the leaves in your photo are looking a little bit too blue, and those walls definitely weren’t yellow in reality!
This happens when the white balance of your photos is off, causing an unintended color cast.
Different types of light sources cast different hues of light ranging from cooler blues to warmer reds; the hue that comes from an old tungsten light bulb is very different from the hue that comes from the sun on a clear day, or a fluorescent lamp.
Your eyes and brain are extremely good at removing these color casts, to keep white objects looking white.
Cameras need to do a similar adjustment. They often do a pretty good job of this as well, but sometimes they need a little help. This is where adjusting the white balance comes into play.
Having the proper white balance is very important for achieving the realistic HDR results you'll want in real estate photos. Unwanted color casts can make your photograph look over processed or unnatural, which makes a bad impression on potential buyers.
When adjusting white balance, the goal is simply to make the whites in the photo look white, and not yellow or blue tinted. If you would like to better understand white balance itself, there is a good article about it on B&H Photography.
Getting the correct white balance can be particularly tricky when shooting real estate interiors because there are often multiple light sources involved.
The combination of natural light coming in from outside, and man-made light from any interior lamps that are turned on (sometimes even with different kinds of bulbs) can make the lighting confusing to the camera’s automatic sensor.
In such cases, you may find that your merged HDR photo has a bit of a yellow cast to it.
Sometimes this can be corrected with some of the settings but the best way to avoid a color cast is to have correct white balance before your photos are even merged. There are a couple of ways to do this.
When it comes to white balance, shooting in RAW has a big advantage. You can adjust the white balance of a RAW photo after the photoshoot, so you don’t have to worry about getting it just right while you’re on location.
Photomatix Pro has some basic white balance controls that you can use (more on that later), but if you need more control you can use an application such as Adobe Lightroom or the software that came with your camera to fine tune the white balance.
If you cannot shoot in RAW, it is best to set the white balance in your camera to something appropriate for the scene before you start shooting, as you may not be able to change it properly after the fact.
Cameras generally have a number of preset white balance settings, such as Daylight, Tungsten Bulb, and Fluorescent Light, but for more accurate colours, you can use your camera's Custom white balance setting.
This involves taking a photo of a gray or white card, in the lighting that will be shining onto your scene. Your camera then uses this to determine the right white balance.
If you're not familiar with how to set the white balance on your camera, your user manual should be able to help. There are also some helpful videos on YouTube for many camera models.
If your source photos are RAW files, you can set the white balance directly in Photomatix Pro while you are loading your bracketed set. Here’s how:
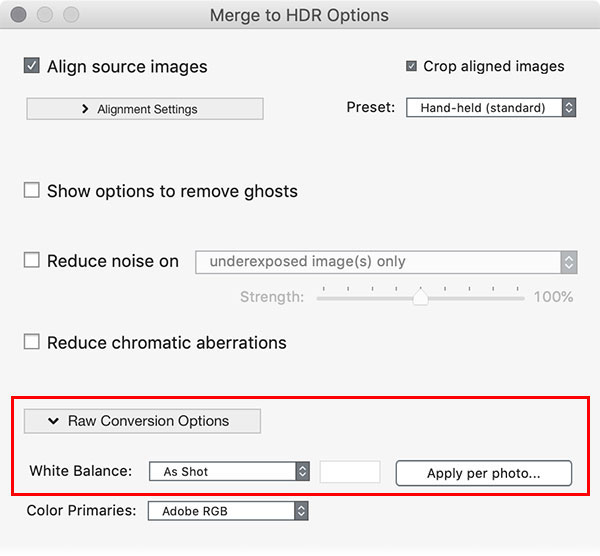
There are also some cases where you may wish to use a different white balance setting on individual brackets. For instance, if you are shooting the interior of a room with a large window and a clear view outside, you would likely need custom white balance settings, as the sun outside will be casting a different hue than the lighting inside.
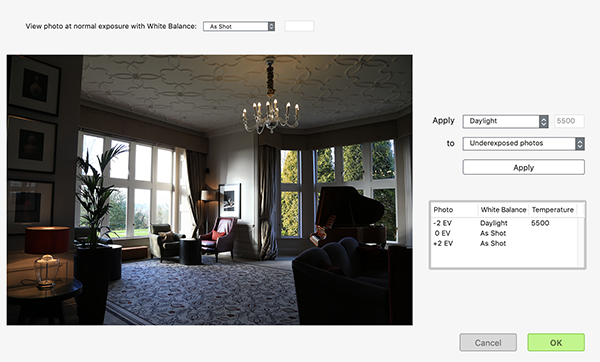
To do this, click on the “Apply Per Photo” button. This will bring up options that allow you to set one white balance for the underexposed brackets featuring the view outside, and a separate one for the overexposed brackets set for the interior.
With proper white balance, you can achieve beautiful, natural looking lighting in your real estate photographs.