I recommend using an equatorial mount with a motor to follow the sun's motion during the eclipse. The eclipse duration is only 2 minutes and 40 seconds, and every second is important. With a standard tripod, you could risk missing part of the eclipse due to the time lost in manual tracking.
A motorized equatorial mount allows you to keep the photos well framed during the totality. To work most accurately, the mount must be aligned with the earth's polar axis. You should install and test it prior to the eclipse, setting the mount polar axis to the Polar Star, which is visible during the night.
With your 600mm telephoto lens set at an aperture of F/8, I recommend taking exposures varying from 1/2 to 1/500 second at ISO 400. This would mean taking a bracketed set of 9 photos spaced by 1EV with the following shutter speeds:
1/500 s, 1/250 s, 1/125 s, 1/60 s, 1/30 s, 1/15 s, 1/8 s, 1/4 s, 1/2 s
These shutter speeds are given for an F/8 aperture. If you work at F/5.6, keep the same shutter speeds but set your camera sensitivity to ISO 200 instead of 400. If your telephoto aperture is F/11, keep the same shutter speeds and ISO 400, but add an extra 1-second exposure at the end of the bracketed set.
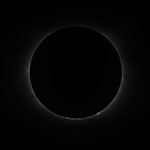
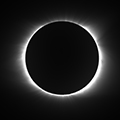
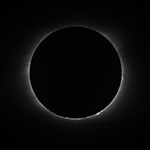
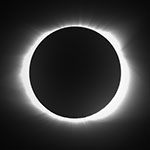
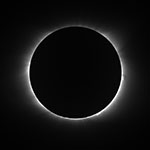
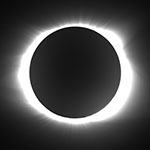
The short exposures are useful to show solar prominences at the very beginning and the very end of the totality (the prominences become most visible around 15 seconds after the beginning and 15 seconds before the end of the totality). The longer exposures reveal the external corona and the brightest stars located in the field of the Sun.
To summarize, my two main recommendations are:
Note that you will have to align the bracketed photos manually before merging them to HDR, even if you use an equatorial mount. See more details on aligning eclipse photos below.
If you don't have an equatorial mount, then do not move the tripod during the two and a half minutes of the totality.
Instead, it is better to plan the framing and focal length so that you can capture the full eclipse without re-centering the camera. During the two and a half minutes of the totality, the sun will move a distance of its own diameter from left to right.
Use manual focus to ensure the camera won't lose focus during the totality.
A total solar eclipse is a stressful situation, and you have to be very well prepared because so much happens during these two and a half minutes. During the last few minutes before totality, make sure you have everything prepared: focus, shutter speeds, and framing. Then you can enjoy the show!
You will have to be very focused on your photography to succeed. If you haven't photographed an eclipse before, be aware that it's very difficult to focus because the ambient light is falling so dramatically. The colors and shadows change, people shout and applaud everywhere around you, your heart starts beating very quickly - some people may even start crying. It is a very moving, 'once in a lifetime' experience.
You will need to align your photos of the eclipse manually. The automatic image alignment built into Photomatix compensates for camera movements (typically due to shooting hand-held), while the mis-registration in the case of a solar eclipse comes from the movement of the sun and the image shifting it causes.
Image shifting can occur even when using an equatorial mount, due to incorrect polar alignment of the equatorial mount, or to the moon's motion in front of the sun, which becomes visible after a few seconds.
You can align the photos manually in Photoshop using layers as detailed below:
I recommend saving the aligned images as TIFF, though you can also save them as JPEG.
You can now load the aligned images in Photomatix Pro. On the 'Merge to HDR Options' window, make sure to UNcheck the 'Align images' option.
If you are preparing for the 21st of August 2017 solar eclipse, note that a bright star called Regulus will be visible about 1 degree to the left of the sun. With a 600 mm telephoto lens, you'll certainly have it in your photos, even the shortest ones. If Regulus is visible on your bracketed photos, you can use it to help align the images.
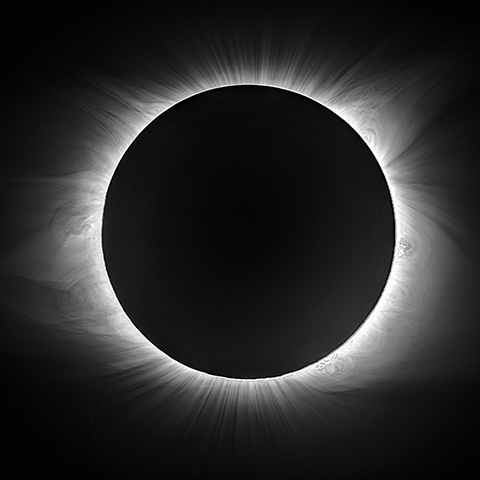
I took the 6 bracketed photos shown at the top left of this page using a ZWO ASI-1600MM astronomical camera and a Swarovski 80 HD Spotting Scopes telescope with a 800 mm focal length and 80 mm diameter.
I then processed the photos as follows:
On the 'Merge to HDR Options' window: