The shooting phase is essential for getting good results with Photomatix Pro. To photograph a high contrast scene, you need to take several exposures in order to capture information in both the highlights and the shadows of the scene. The exposures taken must properly cover the dynamic range of the scene, especially the shadows.
The number of photos you need depends on the scene. It also depends on the Exposure Value (EV) spacing separating the photos. If you take them in one-EV steps (e.g., -1, 0, +1 EV), you will need more photos than if you take them in two-EV steps (e.g., -2, 0, +2 EV). We recommend shooting in two-EV steps whenever possible.
High contrast scenes can be grouped into roughly two types depending on their dynamic range:
Medium dynamic range scene: Most landscapes and other types of outdoor scenes fall into this category. Three exposures taken in two-EV steps (i.e. –2, 0 +2 EV), or five exposures taken in one-EV steps, are usually sufficient for this type of scene.
High dynamic range scene: A typical example is the interior of a room with a view outside the window on a sunny day. You need to take at least five exposures in two-EV steps (or nine exposures in one-EV steps) to capture this type of scene, but you may need more.
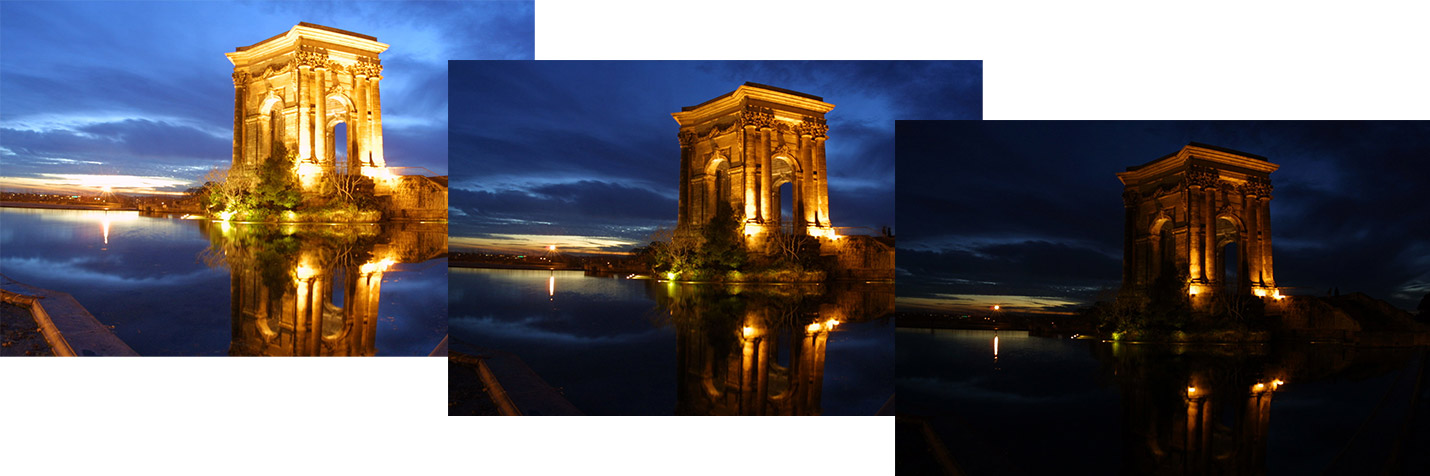
Three exposures of a medium dynamic range scene, taken in two-EV steps
The source photographs for HDR processing can be taken with digital or film-based cameras. The only requirement is that the exposure can be adjusted when taking pictures. If you use a film-based camera, you will need to scan the photographs into your computer before processing them.
Setting up the Camera
- Set your camera to Aperture priority (the "A" setting) so that only shutter speed will vary between the exposures.
- Set a low ISO such as ISO 100, or lower if available.
- Turn off the flash. The flash may try to balance the exposure of all the images, when the goal instead is a range of exposures.
- A tripod is typically recommended, but is not required, as Photomatix Pro includes options to automatically align hand-held bracketed sets.
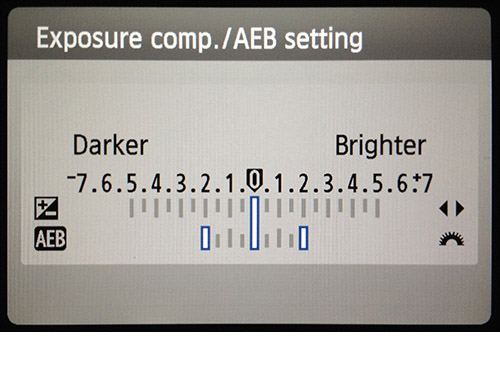
Canon Rebel T2i/550D LCD showing AEB with +/-2 EV increments selected
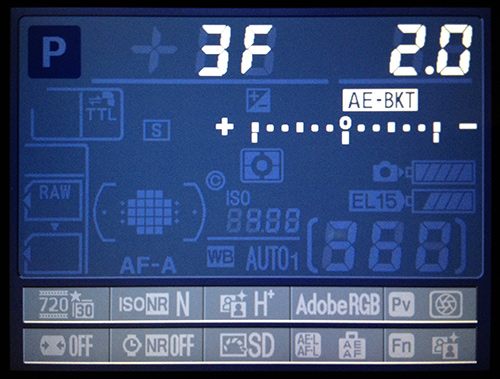
AEB settings on a Nikon D7000 (3 frames, at +/- 2 EV)
DSLR and mirrorless cameras, as well as some compact digital cameras, offer Automatic Exposure Bracketing (AEB). This feature enables you to automatically take three or more exposures in a row: one at the proper exposure, one or more underexposed, and one or more overexposed. Follow these steps if your camera offers AEB mode:
- Select the Continuous shooting mode on the camera’s drive setting. Consult your camera manual for model-specific instructions for using this setting.
- Set the camera to Auto Exposure Bracketing (AEB).
- If possible, use the camera’s self-timer setting, a cable release or a wireless shutter release to minimize camera shake.
- Set the exposure increment to +/- 2 for optimal exposure range. If your camera does not offer +/- 2 exposure increments, select the maximum possible. Consult the camera manual for model-specific instructions for choosing this setting.
Note
The continuous shooting mode may not always be the best strategy, because camera shake may build up. It is recommended to use a method that ensures the least possible shake for each single shot, such as mirror lock-up functionality, if available.
Exposures
To get good results with HDR processing, your bracketed sequence must include photos that correctly expose highlights as well as photos that correctly expose shadows. The latter is especially important to prevent noise in the processed HDR image.
In the lightest photo of the sequence, the darkest shadow areas of the scene should be shifted at least into the mid-tones. To check this, use your camera’s histogram preview in playback mode. In your most overexposed photo, the left part of the histogram should be empty until 1/3rd of the histogram’s width. If this is not the case, add one or more photos taken with longer exposure times. Another option is to re-shoot the exposure sequence with the normal exposure set one or more EVs higher if your most underexposed image in the exposure sequence was too dark. This is the case when the histogram of your darkest image is completely empty on the right half.
The number of exposures needed depends on the dynamic range of the scene, in addition to the exposure increment. For most outdoor scenes, three exposures taken at +/- 2 exposure increments is sufficient, provided the scene does not include the sun. However, for the interior of a room with a bright view out the window, you will need at least five images taken with an exposure increment of +/- 2, or nine images taken with an exposure increment of +/- 1.
Selecting Exposures
The number of exposures to shoot depends on the dynamic range in frame, the exposure difference between the darkest and brightest areas of the scene. Your brightest exposure must capture the darkest areas of the scene, and the darkest exposure must capture the brightest sections of the scene.
The total number of exposures also depends on the Exposure Value (EV) spacing between each exposure. If you shoot your exposures in 1 EV steps, you will need more exposures to capture the entire dynamic range of a scene than if you shoot them in 2 EV steps. We recommend shooting in 2 EV steps whenever possible.
A typical outdoor scenes will usually require 3 shots at 2 EV spacing (i.e. -2, 0, +2. Very high contrast scenes, such as a interior with a bright window in the frame, will typically require 5 frames, at 2 EV steps, and sometimes more.
A 2 EV spacing has several advantages compared to an 1 EV spacing. It requires fewer shots to span the dynamic range, and therefore reduces the risk of ghosting in non-static scenes. It also reduces storage needs and makes for faster processing in Photomatix. On the other hand, an 1 EV spacing -or lower- does have the advantage of better smoothing out noise when merging to an HDR image.
Interiors with Bright Windows, and other High Contrast Scenes
Capturing a particularly high contrast scene, such as a room interior which includes a bright window, requires more bracketed exposures. The key to getting a good result with such scenes is to take enough exposures to properly cover the dynamic range. In most cases, you will need at least five exposures, spaced 2 EVs apart. If you take fewer exposures, you may get washed-out highlights or noisy shadows due to "holes" in the coverage of the dynamic range.
To help determine the exposures required in scenes with extreme differences between the lightest and darkest details, you can use the HDR Exposure Calculator tool available in the "HDR Tutorial for real estate photographers" linked below.
When using Photomatix Pro to edit real estate photos, we recommend you display just the "Architecture" category (using the presets filter menu, above the thumbnails list on the right). The presets with "Interior" in their name are optimized for room interiors with bright windows, and provide a good starting point when working with high contrast scenes in general. The presets "Interior" and "Interior 2", are particularly good at keeping a balanced and "photorealistic" look, while still preserving highlights. For real estate interiors in particular, please refer to these real estate shooting tips.
The steps listed below apply to any scene with very high contrast. If you are taking real estate interiors with bright windows, see more specific instructions in the HDR tutorial for real estate photographers.
These steps listed below apply to any scene with very high contrast:
- Set the ISO below 400.
- Set your camera to Aperture priority, and set the aperture for the scene, based on the depth of field you are trying to achieve or other considerations.
- Set your camera to Auto Exposure Bracketing (AEB). If you are not familiar with the AEB functionality of your camera, see the Automatic Exposure Bracketing Setup page or consult your camera's manual..
- Using the AEB option, set the EV spacing to +/- 2 EV if your camera supports it, otherwise to the highest EV spacing it supports.
- Switch your camera’s to spot metering mode. Aim the camera at the darkest area of the scene and adjust the shutter speed until your camera indicates a correct exposure. This will be the shutter speed for your most overexposed photo.
- Aim the camera at the brightest area of the scene and adjust the shutter speed until your camera indicates a correct exposure. This will be the shutter speed for your most underexposed photo.
- [Optional]: To check the shutter speeds you just measured, it is a good idea to take a photo for each meter reading and look at the camera’s histogram. If the histogram graph touches the left side, this indicates that there is lost shadow information. If the graph touches the right side, this indicates burned out highlights.
- Using this HDR Exposure Calculator enter the shutter speeds you measured in Steps 5 and 6.
- Switch the camera to Manual mode and Set the Shutter Speed determined by the HDR Exposure Calculator for the first bracketed set.
- Select the Continuous Shooting mode on the camera and release the shutter to take the first set of bracketed photos.
- Take the other photos or bracketed photos determined by the HDR Exposure Calculator, if any. Note that you will need to use a tripod if you cannot cover the range with just one bracketed set.
Using Film-Based Cameras
Scan film or slides, not prints. Photo labs attempt to make the best print from each of your source images, and you will not achieve good results scanning these for HDR generation.
- Follow the camera setup listed in Setting Up and the tips on selecting exposures. Keep in mind that you will not have the option of previewing the live histogram to determine your exposure range.
- Turn off your scanner’s auto-exposure options. This allows you to manually control the exposure.
- Make sure you select the Align images option in Photomatix Pro when combining your images.