HDR Tutorial for Real Estate - Merging Exposures

Merging Photos of a Real Estate Interior

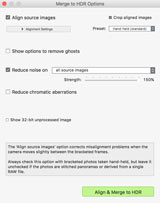
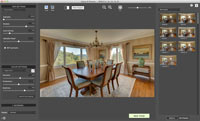
Once you have taken bracketed exposures that capture both the darkest part of the interior and brightest parts of the windows as shown in part I, follow the steps below to merge the photos in Photomatix Pro.

1.
Open Photomatix Pro and click Browse & Load to select the photos you've taken in part I. Then click Next: Choose Merge Options.

If you have Lightroom, you can use Photomatix from Lightroom via the Plugin for Lightroom included in Photomatix Pro.

(click to enlarge)
2.
In the Merge to HDR Options dialog, check Align source images and Reduce noise. Then, click Align & Merge to HDR .

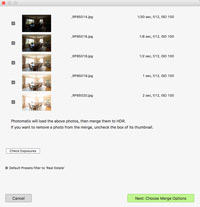
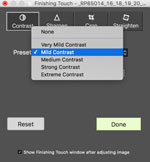
Make sure to leave the 'Show options to remove ghosts' box unchecked (ghost removal should only be used for scenes with moving objects or people).

3.
Once the Adjust & Preview window appears, locate the Preset thumbnails panel on the right. Check that the pop-up menu on top of the thumbnails is set to Real Estate and if not, select it.
4.
Click on the preset thumbnails to view their effect on the Preview image. The Natural and Interior 2 presets are often a good start.
5.
Use the sliders on the left to further adjust the effect. Once you are satisfied with the image, click Next: Finish to render the image at its original resolution.
6.
The Finishing Touch panel lets you add contrast to your image, sharpen it, and crop and straighten it. Straightening is useful to fix perspective issues where lines don't look parallel when they should, or when vertical things like walls aren't vertical.
7.
To save your image, click Save Final Image.
If you have many photos to process, you can automate the task with Batch Processing. NEXT: Automate