Do you need to photograph an interior with bright light coming through the windows? Are you wondering why you often get photos where the interior is too dark?
In this tutorial, you'll learn how to take interior photos where the room is bright and the view is preserved.
Part 1 lists the steps and camera setup to take the photos. You'll actually take multiple shots, each with a different exposure.
Part 2 shows how to merge the photos into a well exposed interior picture.

Follow the camera setup below to take the photos with the simple technique.
If you are a professional photographer, or need to ensure to get all details in the window's view, use the advanced technique instead.
The simple technique assumes your camera has an AEB (Automatic Exposure Bracketing) function that lets you take at least 3 photos in 2 EV steps (or 5 in 1 EV step).
Camera Setup Instructions
Aim your camera to a point in the room which has an average brightness level. Keep away from the brightest areas such as the windows and from the darkest parts of the interior.
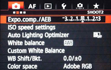
Make sure your camera is set to spot metering mode (not matrix metering) when you are doing this.
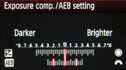
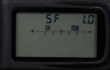
Set your camera to Auto Exposure Bracketing (AEB) mode.
If you aren't familiar with setting AEB on your camera, check the Exposure Bracketing setup tutorials.