This tutorial shows how to photograph a room's interior when there is a bright view through the window.
Part 1 lists the steps to shoot the scene, part 2 the steps to merge and render the photos in Photomatix.
Photographing an Interior - Advanced Technique
An interior with bright views out of the windows is a scene with very high contrast.
Taking several photos (underexposed photos for the windows, overexposed for the interior) will allow you to capture both the interior of the room and what is outside the window, without using lighting equipment.
The advanced technique for taking the exposures is detailed below.
Use the advanced technique if you are a professional photographer or when you need to ensure that all details in the view are rendered. Otherwise, try the simple technique.
Camera Setup Instructions
1.
Check that the flash of your camera is switched off.
2.
Set your camera to Aperture priority mode (usually abbreviated A or Av).
3.
Switch your camera to spot metering mode. Position the focus point over the darkest part of the scene and read the shutter speed.
4.
Position the focus point over the
brightest part of the scene (avoiding sun reflections and bare light bulbs) and read the shutter speed.
Note: If bright light is entering the camera, cover the viewfinder with your hand to ensure your reading is correct.
5.
Open the
HDR Exposure Calculator and enter the shutter speeds you measured in Steps 3 and 4.
6.
Switch the camera to Manual mode.
7.
Set the Shutter Speed determined by the HDR Exposure Calculator for the first bracketed set.
8.
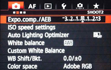
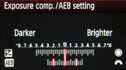
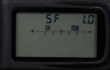
Set your camera to Auto Exposure Bracketing (AEB) mode.
Canon 5D III
Nikon D700

9.
Using the AEB options, set the Exposure Increment to +/-
2 EV if your camera supports it, or otherwise to the highest it supports.
If you aren't familiar with the AEB feature of your camera, check the Exposure Bracketing Setup tutorials or consult your camera's manual.
Canon 7D
Nikon D700
10.
Select Continuous Shooting mode on the camera and press the shutter button to take the first set of bracketed photos.
11.
Take the other photos, or bracketed sets determined by the HDR Exposure Calculator, if any.
Note: If you need to take more than one bracketed set, use a tripod to take the photos.
Once you have taken the photos,
merge them in Photomatix.
NEXT: Merge to HDR