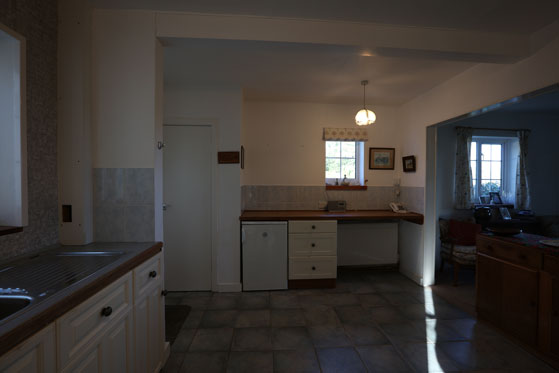
Ever tried to take a real estate interior and ended up with a dark photo and blown out windows? If this rings a bell don't worry, it's not just you. Photographing an interior with a bright view through the windows is one of the most demanding photography assignments, and one that challenges even seasoned professionals.
So let's look at why this happens, and the techniques that pros use to get around the problem.
It's all about something called dynamic range. This is the difference, or range, between the darkest and brightest parts of a scene. When there is a huge difference, for example between the darkness of a room interior and brilliant sunshine streaming through the window, the scene has a high dynamic range, or HDR for short.
Our eyes cope with HDR scenes by altering the size of our pupils, letting in more light when we look at dark areas, and less when we encounter brighter areas. The brain balances it all out and everything seems well lit.
Unfortunately,even the best DSLR cameras can't cope with the big difference between the darkest and brightest parts of an HDR scene, so professional photographers have developed several techniques to get around the problem.
Here are five of the more common techniques to avoid the dark photo with blown out windows scenario when photographing interiors:
Take a correctly exposed photograph of the room, and then another exposed for the view through the window. Load both into Photoshop in separate layers, placing the photograph of the room on top and the photograph of the window in the bottom layer.
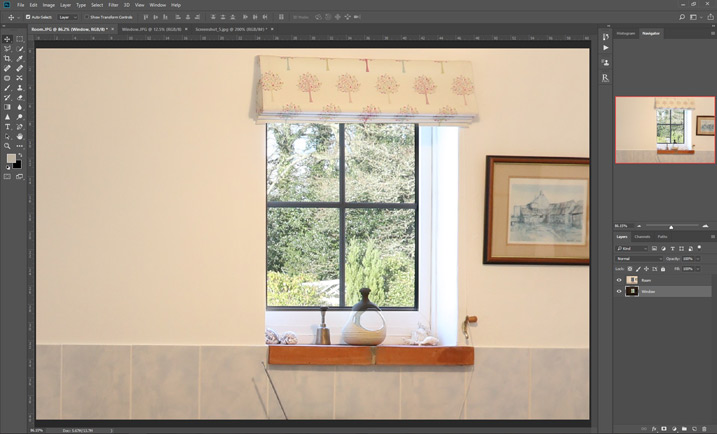
Using the transparency mask tool, make the entire window area in the top image transparent. If the two images align perfectly, the correctly exposed window will now show through from the bottom layer.
It's a quick fix if you are familiar with Photoshop, but the edges of the window almost always look odd. Another issue is when the images don't align with each other, as you'll spend ages making them match.
Wait for a rainy or really cloudy and dull day when the lighting inside and outside is pretty much identical. Take a photo that's exposed for the room, and everything, including the window, should come out reasonably well.
It's a very quick and easy solution, but it's rare to get a day when the lighting is just right. Another problem here is that dull days rarely make the room look good.
Use powerful photographic lights to flood the room with light to match the brightness outside.
The results can look professional, but like all camera kit, lights cost money. They are heavy, need a power supply, and using them correctly requires practice and skill.
Use a flash when you take the photo, to reduce the difference in brightness between the room and the window. The flash must be used ‘off the camera' on an extension cord so it doesn't point straight at the window and cause a blinding reflection when it is fired.
Flash guns have the advantage of being much lighter and smaller than professional lights, and professional flash units can deliver a lot of light. However, the flash that comes built-in with your camera will rarely, if ever, be powerful enough to do the job.
For more information on using flash compared to HDR merge, check the HDR Versus Flash In Real Estate Photography article on the SLR Lounge website.
Take a series of photographs, each with a different exposure. The over-exposed photos capture the dark areas of the room, the middle exposures capture the averagely lit areas, and the under-exposed ones capture the bright areas.
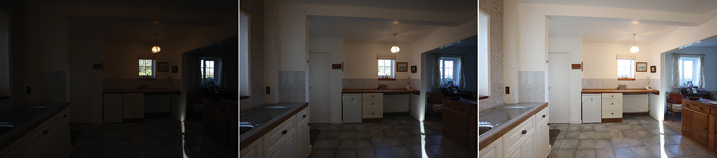
The clever bit comes at the end, when you merge all the images together to create a new photograph where everything is perfectly exposed.
This technique takes a little longer than the others, and you need access to HDR software. However, the quality of the final images far outweighs the inconveniences.
The technique is called HDR photography, and it's the one most professional photographers use.
There are various photo applications that can merge multiple exposures to HDR. Many pro real estate photographers choose Photomatix Pro because it offers natural looking presets optimized for interiors
Learn about the HDR merging technique for interiors in the HDR Tutorial for Real Estate Photography.
More resources on HDR photography for real estate: