Use batch processing to automatically process image files. The batch processing tool saves time processing many images. Photomatix for Linux offers two different batch modes:
- Batch Bracketed Photos: Processes multiple bracketed sets in one step, which can save you a lot of time when you have many bracketed sets to merge.
- Batch Single Photos: Processes multiple single image files using HDR Tone Mapping.
Batch Processing Bracketed Photos Sets
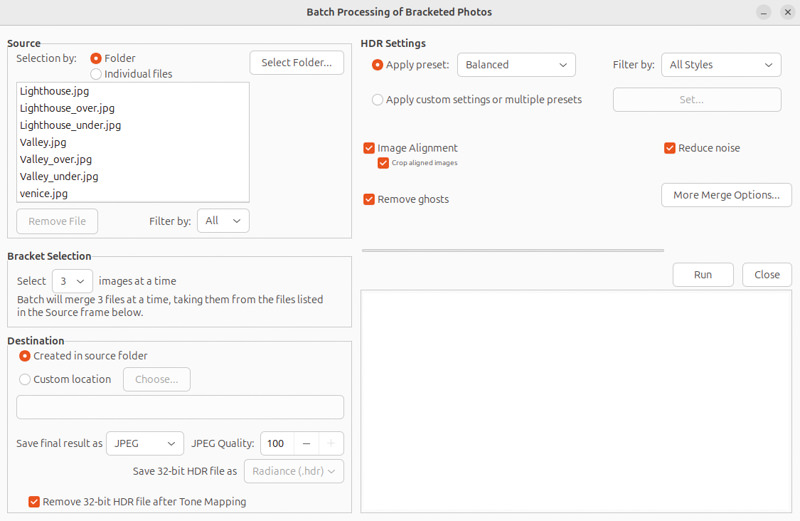
Batch Processing of bracketed photos
To batch process multiple sets of bracketed photos follow these steps:
- Open the Batch Processing of Bracketed Photos window by selecting Batch Processing from the Automate menu or using the Ctrl+B keyboard shortcut.
- In the Source section, select the folder where the bracketed photo sets are located. The files are arranged in alphabetical order. "N" files at a time are processed where "N" is the number specified in the next step.
- In the Bracket Selection section, select the number of exposures to merge using the pull-down menu. For example, select “3” if your bracketed sets consist of three exposures each.
- In the Destination section, select the output file type. When using JPEG file output, select the amount of JPEG compression. 100 gives the least compressed JPEG file, with most image quality retained.
- If you want to save the results in a different folder than the folder containing the source photos, select Custom Location option in the Destination section, and then click Choose... Otherwise, select the default of Subfolder within Source Folder. This will create a subfolder with the name "PhotomatixResults" in the source folder selected in the Source section.
- Select the preset that will be applied to all the bracketed sets in this batch. To do this, select first the category to which the preset belongs from the Preset in category pull-down menu, then select the preset on the next pull-down menu.
- Specify whether image alignment, ghost removal or noise reduction are needed. Image alignment is recommended, unless your bracketed sets are stitched panoramas or "fake" exposures derived from a single Raw file. Noise reduction is recommended too, especially with Raw files. However, ghost removal should only be selected for images that do need it, and left unchecked otherwise.
- Click Run to start batch processing.
Note
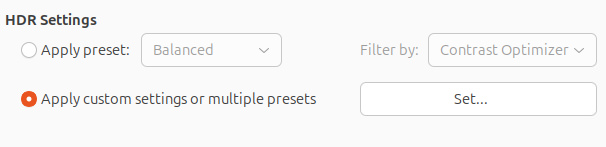
The Custom settings or multiple presets option allows you to select custom settings and also to process each bracketed set with more than one preset.
While the batch is running, the processing status will display in the area below the Run button. When processing is complete, the path to the batch results will be displayed.
Custom Settings or Multiple Presets window
The Custom Settings or Multiple Presets window is accessed by clicking the Set... button at the top of the batch processing window. This window allows you to compile a list of multiple built-in presets and/or custom settings, to be applied to a single bracketed image set or to a batch of bracketed image sets. This feature may be thought of as "Preset batches". The presets batch lists compiled in this window are applied to the image set batches which are specified in the Source frame of the main batch window.
Click Set... to set up preset batches
Preset batches applied to bracketed sets provides a wide range of processing options. You may wish in some instances to work with just a single bracketed set, and apply a batch of 20 or 30 different presets to it, allowing you to conveniently test which presets give the most pleasing results for a given image set.
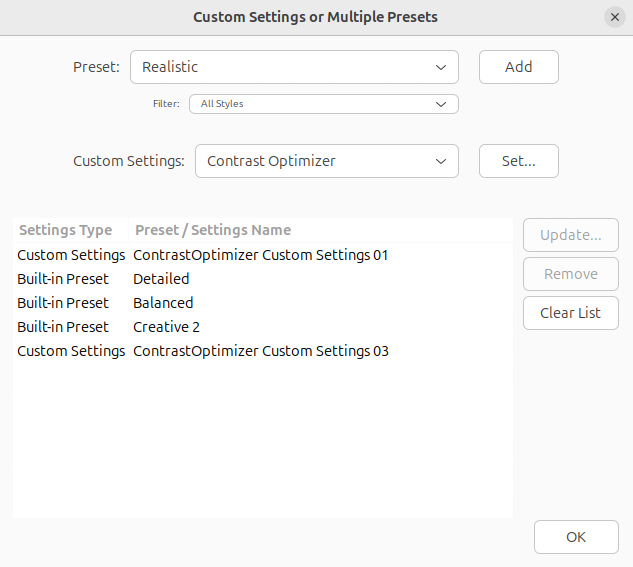
The Custom Settings or Multiple Presets window
Another strategy is to apply several different favorite presets to multiple image sets. While exploring this tool, be aware that the batch results can become very large.
For example, 30 Presets applied to 30 bracketed sets will output 900 processed images. Plan ahead for the processing time and the disk space required when combining large preset batches with large image set batches.
To set up a batch of existing presets, follow these steps:
- Select a Built-in preset, or one of your own saved presets, from the Preset menu and then click Add.
This preset will appear in the list frame. - Repeat step 1 as many times as you like, to add additional presets to the list.
- If you wish to remove a preset from the list frame, select it and click Remove.
- You may now click OK to close this window.
The specified presets will be applied the next time a batch is run.
To set up a batch of modified presets or new custom settings, follow these steps:
- Select an HDR Style/Method from the Custom Settings menu, and then click Set...
The Settings Adjustments window for the selected method will open. - Select a preset from the Preset menu, and modify as desired.
OR
Modify the existing settings. The existing settings are the default for that method. - Click OK. The new custom setting will be added to the list frame.
- Repeat steps 1, 2 and 3 as many times as you like, to add additional custom settings to the list.
- If you wish to update a previously added custom setting, select it in the list frame, and click Update...
- If you wish to remove a custom setting from the list frame, select it and click Remove.
- You may now click OK to close this window.
The specified presets will be applied next time a batch is run.
More Merge Options
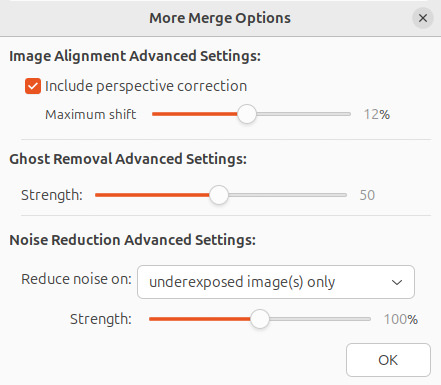
More Merge Options window
Use the More Merge Options... button to access more advanced alignment, deghosting and noise reduction settings.
Batch Single Photos
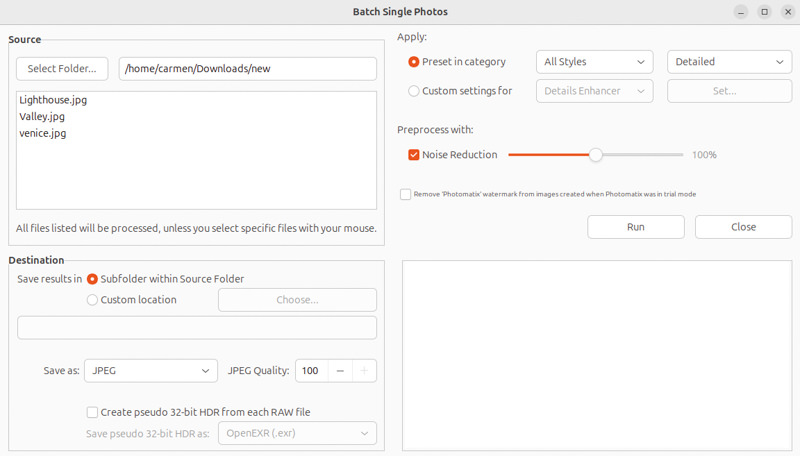
Batch HDR Processing of Single Photos
To process a batch of single image files, follow these steps:
- Select Batch Single Files from the Automate menu.
- In the Source section, select the folder where the files are located. Optionally, you may select a subset of the displayed files to process by holding the Control key and clicking on the files you want to select for processing.
- If you want to save the results in a different folder than the folder containing the source photos, select Custom location option in the Destination section, and then click Choose.... Otherwise, select the default of Subfolder within Source Folder. This will create a subfolder with the name "PhotomatixConversion" in the source folder selected in the Source section.
- Select the output file type. When using JPEG file output, select the amount of JPEG compression. 100 gives the least compressed JPEG file, and best image quality.
- Select the preset that will be applied to the images that are listed in the source section. First, select the category to which the preset belongs, from the Preset in category pull-down menu. Then select the preset on the next pull down menu.
To Process the files using custom HDR settings, select an HDR method from the Custom Settings for menu, click Set..., and then configure the preset as desired. - Click the check box for noise reduction if needed.
- Click Run. The batch processing status displays.
Note
The Batch Single Photos feature is intended for automating the processing of many photos. To process a single image file, simply load a single image file.
When complete, a link to the batch results will be displayed.
Note
To remove the "Photomatix" watermark added when using Photomatix for Linux in trial mode, images must not have been retouched after the "Photomatix" watermark was added. If the brightness or contrast of the image has been changed, or the image has been double processed, cropped or resized, then the licensed version of Photomatix for Linux will not be able to remove the trial version's watermark.